0%

大数据

1
2
3
4
5
6
7
8
9
10
11
12
13
14
15
16
17
18
19
20
21
22
23
24
25
26
27
28
29
30
31
32
33
34
35
36
37
38
39
40
41
42
43
44
45
46
47
48
49
50
51
52
53
54
55
56
57
58
59
60
61
62
63
64
65
66
67
68
69
70
71
72
73
74
75
76
77
78
79
80
81
82
83
84
85
86
87
88
89
90
91
92
93
94
95
96
97
任务描述
相关知识
如何使用happpybase连接HBase数据库
编程要求
好了,到你啦,使用本关知识,在右侧命令行完成下面的任务要求:
任务描述
本关任务:使用python代码在HBase中创建表。

相关知识
为了完成本关任务,你需要掌握:1.如何使用happybase 连接HBase数据库,2.如何使用python代码在HBase中创建表。

如何使用happpybase连接HBase数据库
一、连接(happybase.Connection)
import happybase
happybase.Connection(host=’localhost’, port=9090, timeout=None, autoconnect=True, table_prefix=None, table_prefix_separator=b’_’, compat=’0.98’, transport=’buffered’, protocol=’binary’)
获取连接实例
host:主机名
port:端口
timeout:超时时间
autoconnect:连接是否直接打开
table_prefix:用于构造表名的前缀
table_prefix_separator:用于table_prefix的分隔符
compat:兼容模式
transport:运输模式
protocol:协议
例:
connection = happybase.Connection(host=”192.168.0.156”,port=9090,timeout=None,autoconnect=True,table_prefix=None,table_prefix_separator=b’_’,compat=’0.98’, transport=’buffered’,protocol=’binary’)

当connection被创建的时候,默认自动与Hbase建立socket连接的。
若不想自动与Hbase建立socket连接,可以将autoconnect参数设置为False
connection = happybase.Connection(‘10.1.13.111’, autoconnect=False)
然后手动与Hbase建立socket连接
connection.open()
open():打开传输,无返回值
close():关闭传输,无返回值
connection.close()
连接建立好之后查看可以使用的table
print connection.tables()
因为还没有创建table,所以返回结果是 []

二、创建一个table
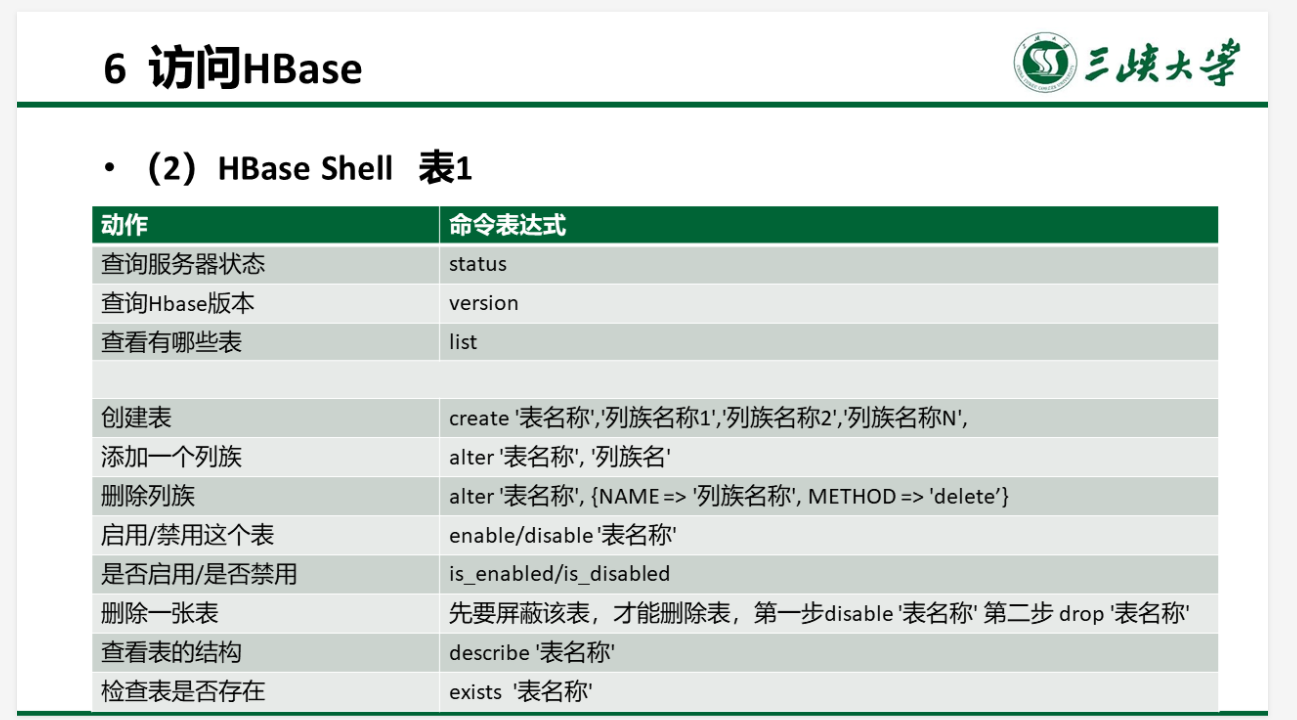
create_table(name,families):创建表,无返回值
name:表名
families:列族
families = { “cf”:dict(), “df”:dict()}
connection.create_table(name,families)
如果连接时,有传递表前缀参数时,真实表名将会是:”{}_{}”.format(table_prefix,name)

connection.create_table(
‘my_table’,
{
‘cf1’: dict(max_versions=10),
‘cf2’:dict(max_versions=1,block_cache_enabled=False),
‘cf3’: dict(), # use defaults
}
)
此时,我们再通过connection.tables()查看可以使用的table,结果为[‘my_table’]
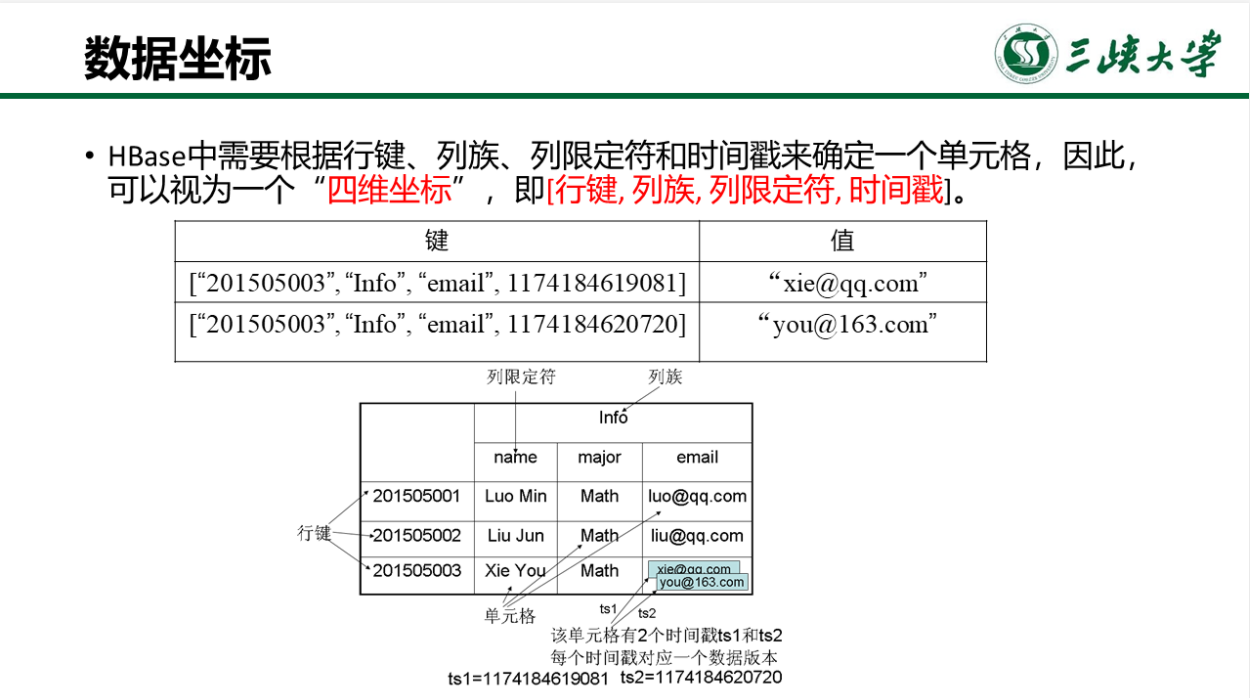
创建的table即my_table包含3个列族:cf1、cf2、cf3

编程要求
好了,到你啦,使用本关知识,在右侧命令行完成下面的任务要求:
1执行环节搭建脚本,为使用Python语言操作hbase做好准备。
cd /data/workspace/myshixun/opt/
chmod +x setup-env.sh
./setup-env.sh
这里可能需要等待几分钟,让脚本执行完,thrift和happybase就安装好了。
接下来可以查看各个服务进程是否启动
jps
‘’
root@evassh-2932225:~# jps
1808 ResourceManager
4785 Jps
2820 ThriftServer
1317 NameNode
2694 HRegionServer
1447 DataNode
2506 HQuorumPeer
1626 SecondaryNameNode
2570 HMaster
‘’
如果启动过程中出现:
localhost: zookeeper running as process 2474. Stop it first. master running as process 2538. Stop it first. : regionserver running as process 2665. Stop it first. thrift running as process 2789. Stop it first.

需要我们重新
/app/hbase-2.1.1/binhbase-daemon.sh stop thrift stop-dfs.sh 和stop-hbase.sh,然后再重启。

2 进入Python编译器完成连接和创建表
python3

3 建立一个本地连接对象conn,使用本机和默认端口建立连接
4 创建一个名为student1的表,有两个列族:info和scores
注意:列族定义之间的逗号后要空一格,否则会出错。
5 可以使用conn.tables()查看表是否创建好。
如果出现‘BrokenPipeError: [Errno 32] Broken pipe’提示,说明连接已经自动关闭,每次连接如果超过60秒没有操作,就会自动关闭,需要重新建立连接。
6 退出Python编译器

开始你的任务吧,祝你成功!
1
2
3
4
5
6
7
8
9
10
11
12
13
14
15
16
17
18
19
20
21
22
23
24
25
26
27
28
29
30
31
32
33
34
35
36
37
38
39
40
41
42
43
44
45
46
47
48
49
50
51
52
53
54
55
56
57
58
59
60
61
62
63
64
65
66
67
68
69
70
71
72
73
74
75
76
77
78
79
80
81
82
83
84
85
86
87
88
89
90
91
92
93
94
95
96
97
任务描述
相关知识
任务描述
本关任务:使用python代码向HBase表中并添加、删除数据,并查看数据。

相关知识
一、添加数据

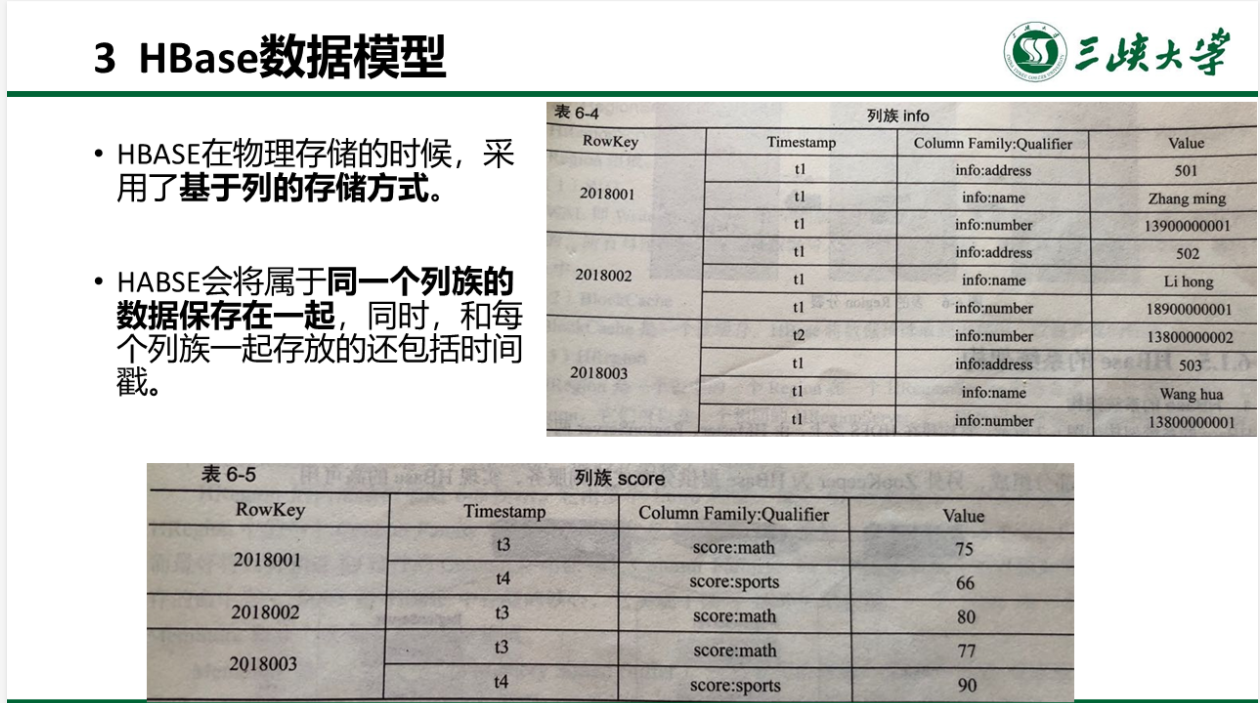
要对一个表添加数据,我们需要一个table对象,使用table.put()方法添加数据:

在上一关的例子中,我们创建了my_table表包含3个列族:cf1、cf2、cf3,现在我们往里面写入数据。你可以试试先自己创建这个my_table表。

table = connection.table(‘my_table’) #首先获得表对象

Hbase里 存储的数据都是原始的字节字符串

cloth_data = {'cf1:content': 'jeans', 'cf1:price': '299', 'cf1:rating': '98%'}
hat_data = {'cf1:content': 'cap', 'cf1:price': '88', 'cf1:rating': '99%'}
shoe_data = {'cf1:content': 'jacket', 'cf1:price': '988', 'cf1:rating': '100%'}
author_data = {'cf2:name': 'LiuLin', 'cf2:date': '2017-03-09'}
table.put(row='www.test1.com', data=cloth_data)
table.put(row='www.test2.com', data=hat_data)
table.put(row='www.test3.com', data=shoe_data)
table.put(row='www.test4.com', data=author_data)
使用put一次只能存储一行数据
如果row key已经存在,则变成了修改数据

更好的存储数据
table.put()方法会立即给Hbase Thrift server发送一条命令。其实这种方法的效率并不高,我们可以使用更高效的table.batch()方法。

使用batch一次插入多行数据

bat = table.batch()
bat.put('www.test5.com', {'cf1:price': 999, 'cf2:title': 'Hello Python', 'cf2:length': 34, 'cf3:code': 'A43'})
bat.put('www.test6.com', {'cf1:content': 'razor', 'cf1:price': 168, 'cf1:rating': '97%'})
bat.put('www.test7.com', {'cf3:function': 'print'})
bat.send()
更有用的方法是使用上下文管理器来管理batch,这样就不用手动发送数据了,即不再需要bat.send()

*使用with来管理batch *

with table.batch() as bat:
bat.put('www.test5.com', {'cf1:price': '999', 'cf2:title': 'Hello Python', 'cf2:length': '34', 'cf3:code': 'A43'})
bat.put('www.test6.com', {'cf1:content': u'剃须刀', 'cf1:price': '168', 'cf1:rating': '97%'})
bat.put('www.test7.com', {'cf3:function': 'print'})
二、删除数据
在batch中删除数据with table.batch() as bat:
bat.delete(‘www.test1.com')
batch将数据保存在内存中,知道数据被send,第一种send数据的方法是显示地发送,即bat.send(),第二种send数据的方法是到达with上下文管理器的结尾自动发送。

** 三、检索数据**
全局扫描一个table
for key, value in table.scan():
print key, value
结果如下:
,

检索一行数据
row = table.row(‘www.test4.com') print row
直接返回该row key的值(以字典的形式),结果为:
{‘cf2:name’: ‘LiuLin’, ‘cf2:date’: ‘2017-03-09’}

检索多行数据
rows = table.rows([‘www.test1.com', ‘www.test4.com'])print rows
返回的是一个list,list的一个元素是一个tuple,tuple的第一个元素是rowkey,第二个元素是rowkey的值
如果想使检索多行数据即table.rows()返回的结果是一个字典,可以这样处理检索多行数据,返回字典
rows_dict = dict(table.rows([‘www.test1.com', ‘www.test4.com']))print rows_dict
如果想使table.rows()返回的结果是一个有序字典,即OrderedDict,可以这样处理检索多行数据,返回有序字典
from collection import OrderedDict
rows_ordered_dict = OrderedDict(table.rows([‘www.test1.com', ‘www.test4.com']))
print rows_ordered_dict

好了,下面开始你的任务啦:
按照右边的文件要求补完代码。
预期输出:
OrderedDict([(b’info:name’, b’John’), (b’scores:Bigdata’, b’89’), (b’scores:database’, b’88’)])
b’95001’ OrderedDict([(b’info:name’, b’John’), (b’scores:Bigdata’, b’89’), (b’scores:database’, b’88’)])
b’95002’ OrderedDict([(b’info:name’, b’Rose’), (b’scores:database’, b’68’)])
b’95003’ OrderedDict([(b’info:name’, b’Greens’), (b’scores:Bigdata’, b’76’)])
如果运行结果报错提示显示表已经存在,
,
查看各个服务进程是否启动
‘’
root@evassh-2932225:~# jps
1808 ResourceManager
4785 Jps
2820 ThriftServer
1317 NameNode
2694 HRegionServer
1447 DataNode
2506 HQuorumPeer
1626 SecondaryNameNode
2570 HMaster
‘’
如果处于启动状态就到到hbase shell中手动删除该表。

开始你的任务吧,祝你成功!

HBase创建操作表 https://www.educoder.net/tasks/hc5rigv6y2t4

1
2
3
4
5
6
7
8
9
10
11
12
13
14
15
16
17
18
19
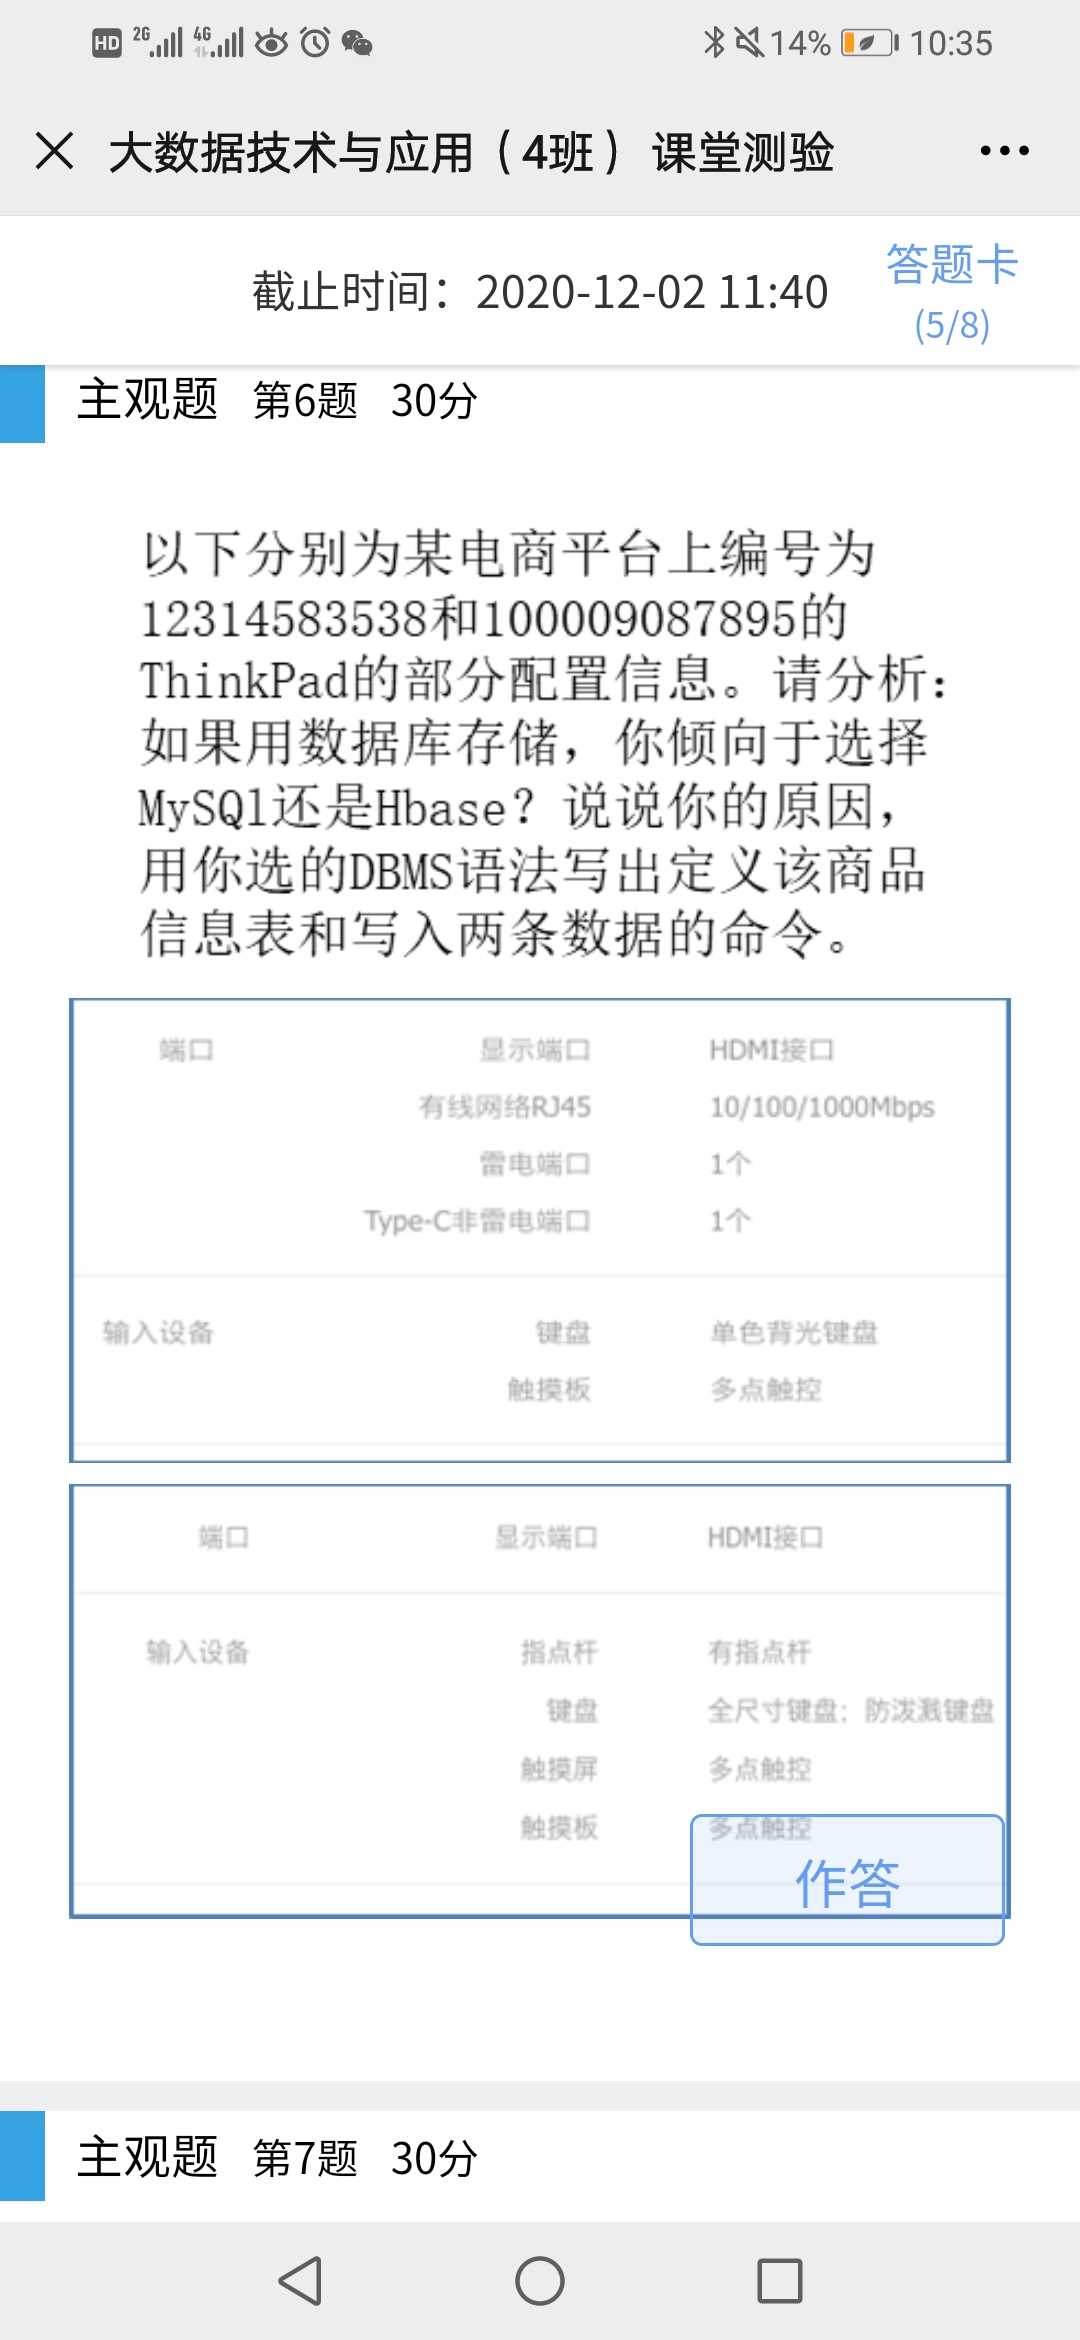
#第一个大题 
import happybase
happybase.Connection(host=’localhost’, port=9090, timeout=None, autoconnect=True, table_prefix=None, table_prefix_separator=b’_’, compat=’0.98’, transport=’buffered’, protocol=’binary’)

创建表:
connection.create_table(
‘shop’,
{
‘cf1’: dict(max_versions=10),
‘cf2’:dict(max_versions=1,block_cache_enabled=False),
‘cf3’: dict(), # use defaults
}
)

#插入
table = conn.table("shop")
bat = table.batch()
bat.put('0001',{'interfaceInfo:inter_show':'HDM1', 'interfaseInfo:inter_network':'10Mbps', 'interfaceInfo:inter_three':'1个','interfaceInfo:inter_Type-c':'1个'})
bat.put('0002',{'inputInfo:input_one':'有指点杆','inputInfo:input_tow':'全尺寸键盘','inputInfo:input_three':'多点触控','inputInfo:input_four':'多点触控'})

image-20201222151712603

image-20201222153426834

image-20201222153450963

image-20201222142737837

QQ图片20201222151459

QQ图片20201222151503

QQ图片20201222151509

mapper.py

1
2
3
4
5
6
7
8
9
10
11
12
13
14
15
16
17
18
19
20
21
22
23
24
25
26
27
28
#! /usr/bin/python3

import sys

def mapper(line):
key = float(line.split(",")[2])

cat = ''
if key <= 630.00:
cat = "mini"
elif key <= 6300:
cat = "mid"
else:
cat = "over"
print("%s\t%s" % (cat, 1))


def main():
for line in sys.stdin:
line = line.strip()
if line.startswith('child'):
pass
else:
mapper(line)

if __name__ == '__main__':
main()

reduce.py

1
2
3
4
5
6
7
8
9
10
11
12
13
14
15
16
17
18
19
20
21
22
23
24
25
26
27
28
29
30
31
32
33
34
35
36
37
38
#! /usr/bin/python3

import sys

def reducer(k, values):
print("%s:\t:%s" % (k, sum(values)))

def main():
current_key = None
values = []
akey, avalue = None, None

for line in sys.stdin:
line = line.strip()

try:
akey, avalue = line.split('\t')
except:
continue
# 2还是上次哪台
if current_key == akey:
values.append(int(avalue))
else:
# 3已经初始化过
if current_key:
# 4 做一次计算
reducer(current_key, values)
# 重新计数
values = []
# 1 初始化
values.append(int(avalue))
current_key = akey
# 循环完毕后处理最后一波
if current_key == akey:
reducer(current_key, values)

if __name__ == '__main__':
main()

spark.py

1
2
3
4
5
6
7
8
9
10
11
12
13
14
15
16
17
18
19
20
21
22
23
24
25
26
27
28
29
30
31
32
33
34
35
36
37
38
39
40
41
42
43
44
45
46
47
48
49
50
51
52
53
54
55
56
57
58
59
60
61
62
63
64
65
66
67
68
69
70
71
72
73
74
75
76
77
78
79
80
81
82
mingqing yisi
xianying nobody
xueling mingqing
xueling xianying
qingqing xueling
qingqing yuelin

#grand.py
from pyspark.sql import SparkSession
from pyspark.sql import Row

spark = SparkSession.builder \
.appName("grandparent") \
.getOrCreate()

sc = spark.sparkContext

raw = sc.textFile("/root/childs.txt") \
.map(lambda x:x.strip().lower().encode("utf-8").split(" ")) \
.map(lambda x: Row(child=x[0], parent=x[1]))


relations = spark.createDataFrame(raw)

# relations.show()

relations.createOrReplaceTempView("table")

result = spark.sql("select a.child as grandchild, b.parent as grandparent from table as a inner join table as b on a.parent=b.child ")

result.show()


spark.stop()

#-------------
# word count via sparksql
from pyspark.sql import SparkSession
from pyspark.sql import Row

spark = SparkSession.builder \
.appName("word count via sql") \
.getOrCreate()

sc = spark.sparkContext

raw = sc.textFile("/root/words.txt") \
.flatMap(lambda x:x.strip().lower().encode("utf-8").split(" ")) \
.map(lambda x:(x, 1))

words = raw.map(lambda x:Row(counts=int(x[1]), word=x[0]))

words_df = spark.createDataFrame(words)
words_df.createOrReplaceTempView("words_table")
# words_df.show(2)
result = spark.sql("select word, sum(counts) as cnt from words_table group by word order by cnt desc")

result.show(3)

spark.stop()

####------------------
# word cout by rdd
from pyspark.sql import SparkSession
from pyspark.sql import Row

spark = SparkSession.builder \
.appName("app") \
.config("spark.some.config.option", "some-value") \
.getOrCreate()

sc = spark.sparkContext

rdd = sc.textFile("/root/words.txt") \
.flatMap(lambda x:x.strip().lower().encode("utf-8").split(" ")) \
.map(lambda x: (x, 1)) \
.reduceByKey(lambda x, y: x+y) \
.sortBy(lambda x:x[1], False)

print(rdd.collect())

spark.stop()
iBoy wechat
欢迎您扫一扫上面的微信公众号,订阅我的博客!