Docker简介
Docker是基于GO语言实现的开源项目。docker的主要目标是“build,ship and run APP,anywhere“
Build Ship and Run
Build(构建镜像) : 镜像就像是集装箱,包含文件以及运行环境等等资源;
Ship(运输镜像) :在宿主机 和仓库间进行运输,这里仓库就像是超级码头;
Run (运行镜像) :运行的镜像就是一个容器,容器就是运行程序的地方。
也就是通过对应用组件的封装、分发、部署、运行等生命周期的管理,
使用户的APP及用户环境能够做到”一次封装,到处运行“
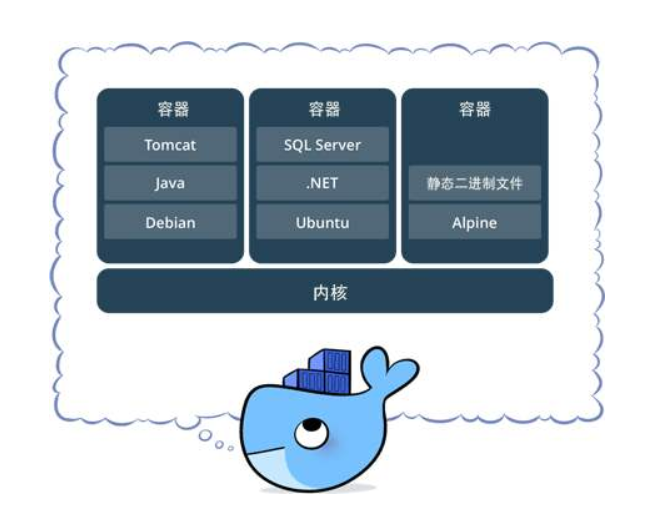
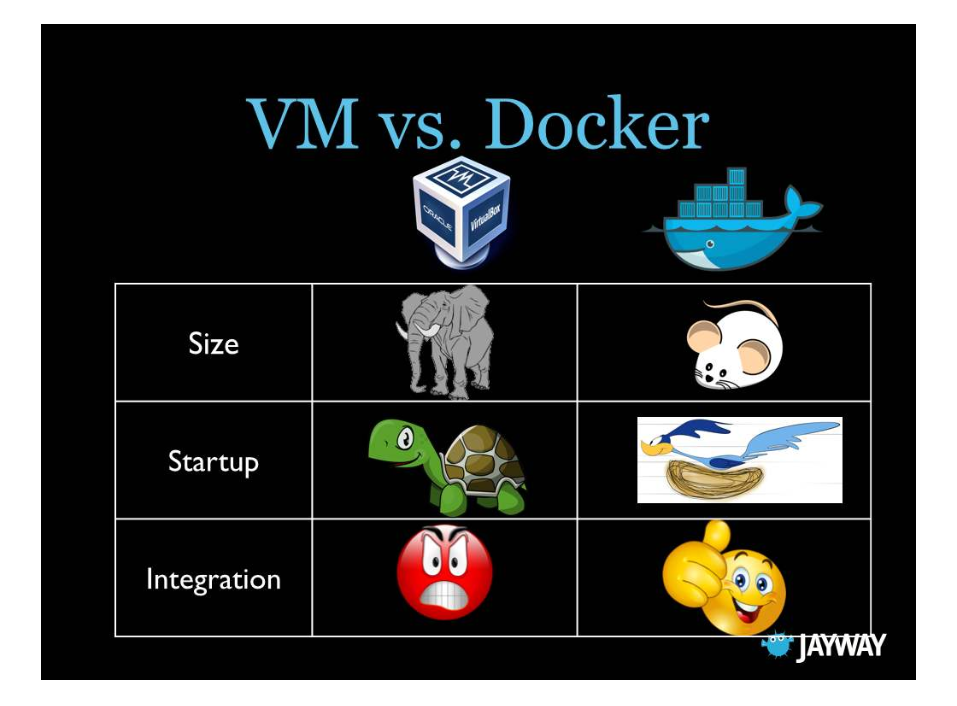
Docker和虚拟机的区别 首先,大家需要明确一点,Docker 容器不是 虚拟机。
!(https://ss2.bdstatic.com/70cFvnSh_Q1YnxGkpoWK1HF6hhy/it/u=3029876800,3884924252&fm=26&gp=0.jpg )
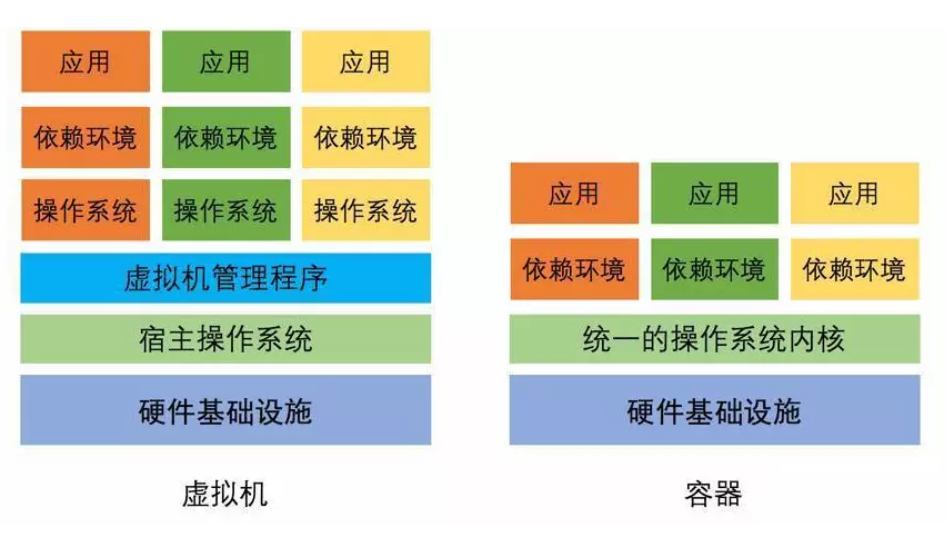
虚拟机是在一台物理机器上,利用虚拟化技术,虚拟出来多个操作系统,每个操作系统之间是隔离的。Docker是开源的应用容器引擎,依然需要先在电脑上安装操作系统, 然后安装Docker容器的管理器,才可以。
虚拟机是在硬件级别进行虚拟化,而Docker是在操作系统的层面虚拟化;虚拟机是通过模拟硬件搭建操作系统,而Docker则是复用操作系统;虚拟机实现了操作系统之间的隔离,Docker只是进程之间的隔离,所以虚拟机隔离级别更高、安全性方面也更强,但Docker的运行速度很快,可以使用秒来计算,而虚拟机的速度通常要按分钟计算。
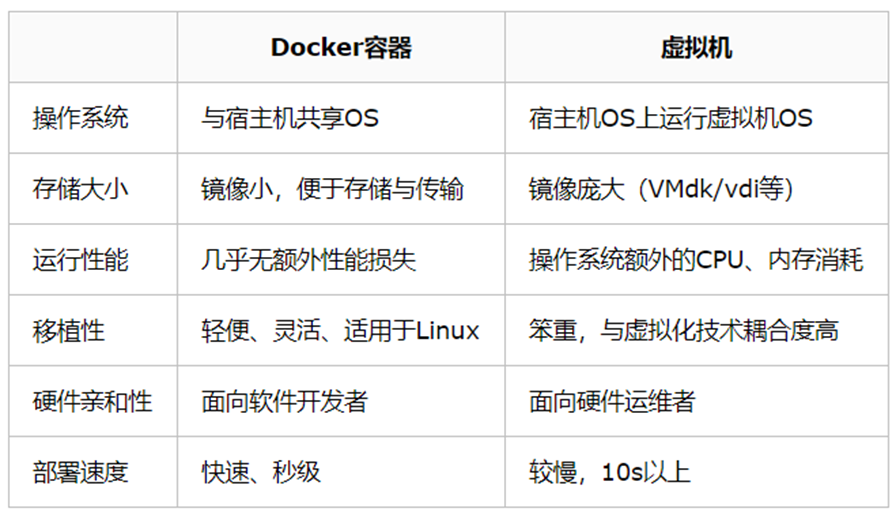
Docker和虚拟机对比 Docker的优点
更高效的利用系统资源
更快速的启动时间
一致的运行环境
更轻松的迁移
统一的管理
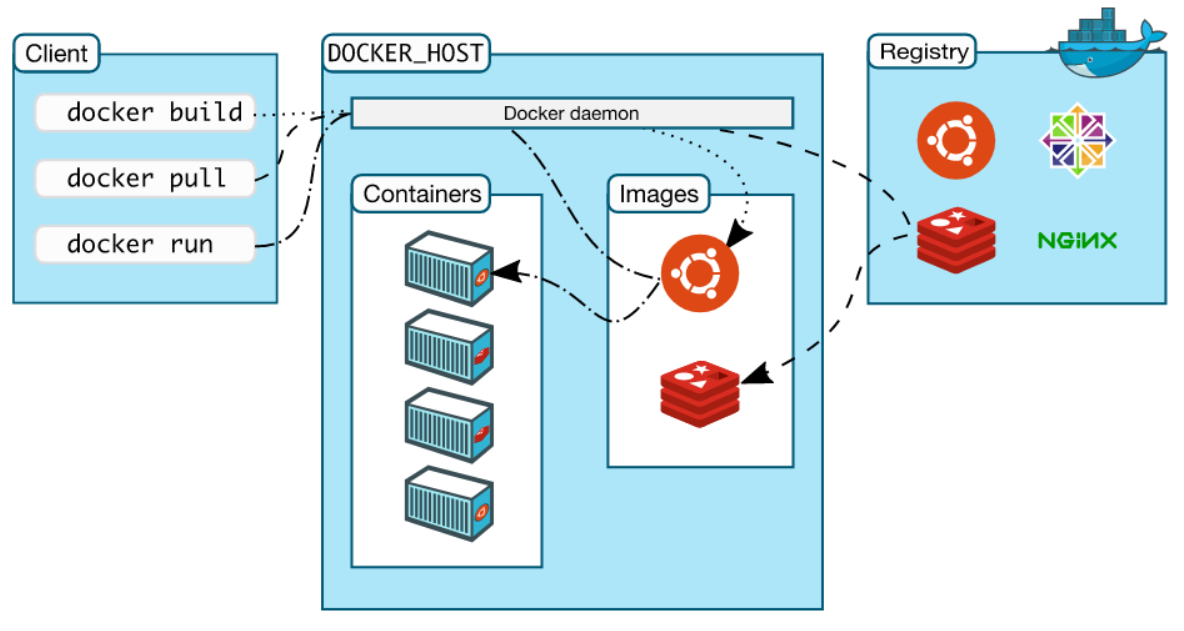
Docker架构 Docker是一个Client-Server结构的系统,Docker守护进程运行在主机上,然后通过Socket连接从客户端访问,守护进程从客户端接受命令并管理运行在主机上的容器。容器,是一个运行时环境,就是所谓的“集装箱” 。
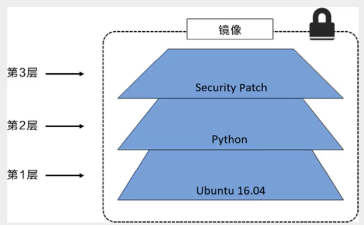
基本概念 镜像 我们都知道,操作系统分为内核和用户空间。对于 Linux 而言,内核启动后,会挂载 root 文件系统为其提供用户空间支持。而 Docker 镜像(Image),就相当于是一个 root 文件系统。比如官方镜像 ubuntu:18.04 就包含了完整的一套 Ubuntu 18.04 最小系统的 root 文件系统。Docker 镜像是一个特殊的文件系统,除了提供容器运行时所需的程序、库、资源、配置等文件外,还包含了一些为运行时准备的一些配置参数(如匿名卷、环境变量、用户等)。镜像不包含任何动态数据,其内容在构建之后也不会被改变。
容器 镜像(Image)和容器(Container)的关系,就像是面向对象程序设计中的 类 和 实例 一样,镜像是静态的定义,容器是镜像运行时的实体。容器可以被创建、启动、停止、删除、暂停等。容器的实质是进程,但与直接在宿主执行的进程不同,容器进程运行于属于自己的独立的 命名空间。因此容器可以拥有自己的 root 文件系统、自己的网络配置、自己的进程空间,甚至自己的用户 ID 空间。容器内的进程是运行在一个隔离的环境里,使用起来,就好像是在一个独立于宿主的系统下操作一样。这种特性使得容器封装的应用比直接在宿主运行更加安全。也因为这种隔离的特性,很多人初学 Docker 时常常会混淆容器和虚拟机。
仓库 镜像构建完成后,可以很容易的在当前宿主机上运行,但是,如果需要在其它服务器上使用这个镜像,我们就需要一个集中的存储、分发镜像的服务,Docker Registry 就是这样的服务。一个 Docker Registry 中可以包含多个 仓库(Repository);每个仓库可以包含多个 标签(Tag);每个标签对应一个镜像。通常,一个仓库会包含同一个软件不同版本的镜像,而标签就常用于对应该软件的各个版本。我们可以通过 <仓库名>:<标签> 的格式来指定具体是这个软件哪个版本的镜像。如果不给出标签,将以 latest 作为默认标签。
Docker安装与启动 使用脚本自动安装在测试或开发环境中 Docker 官方为了简化安装流程,提供了一套便捷的安装脚本,可以通过 –mirror 选项使用国内源进行安装:
1
2
3
4
curl -fsSL get.docker.com -o get-docker.sh \ && sudo sh get-docker.sh --mirror TxCloud \ && sudo systemctl enable docker \ && sudo systemctl start docker
执行这个命令后,脚本就会自动的将一切准备工作做好,并且把 Docker CE 的稳定(stable)版本安装在系统中。
启动 Docker CE
1
2
3
4
5
6
7
sudo systemctl enable docker sudo systemctl start docker sed -i "s/#PermitRootLogin.*/PermitRootLogin yes/g" /etc/ssh/sshd_config sed -i "s/#PubkeyAuthentication yes/PubkeyAuthentication yes/g" /etc/ssh/sshd_config sed -i "s/#PasswordAuthentication yes/PasswordAuthentication yes/g" /etc/ssh/sshd_config service sshd restart
镜像加速 Ubuntu 16.04+、Debian 8+、CentOS 7,在 /etc/docker/daemon.json 中写入如下内容(如果文件不存在请新建该文件)
1
2
3
4
5
echo " { \ \"registry-mirrors\": [ \"https://mirror.ccs.tencentyun.com\" ] }" > /etc/docker/daemon.json
Docker Compose安装 1 2 3 curl -L https://get.daocloud.io/docker/compose/releases/download/1.16.1/docker-compose-`uname -s`-`uname -m` > /usr/local/bin/docker-compose \ && chmod +x /usr/local/bin/docker-compose \ docker-compose --version
Docker可视化 汉化版 1 2 3 4 5 6 7 docker run -d \ -p 9000:9000 \ -v /var/run/docker.sock:/var/run/docker.sock \ -v portainer_data:/data \ --name portainer \ --restart=always \ registry.cn-zhangjiakou.aliyuncs.com/ctgu/portainer
原版 1 2 3 4 5 6 7 8 9 10 11 12 13 14 15 16 docker run -d \ -p 9000:9000 \ -v /var/run/docker.sock:/var/run/docker.sock \ -v portainer_data:/data \ --name portainer \ --restart=always \ portainer/portainer 最新版 docker run -d \ -p 9000:9000 \ -v /var/run/docker.sock:/var/run/docker.sock \ -v portainer_data:/data \ --name portainer \ --restart=always \ portainer/portainer-ce
镜像的构建 Python开发环境构建 1 2 3 4 5 6 7 8 9 10 11 12 13 14 15 16 17 18 19 20 21 22 23 24 25 26 27 28 29 30 31 root@iZ8vbc32qrjl6z690p658hZ:~/docker# docker build -t qmx:1.0 . Sending build context to Docker daemon 4.096kB Step 1/5 : FROM python:3.6-alpine 3.6-alpine: Pulling from library/python df20fa9351a1: Pull complete 36b3adc4ff6f: Pull complete 98eb400f742f: Pull complete 31cc876ef68f: Pull complete e8928b84e39a: Pull complete Digest: sha256:56320bd9f0d878ae0842fc03f078b4e081ca8cf58492bc71bd4aa53a6958a632 Status: Downloaded newer image for python:3.6-alpine ---> d6b500d78779 Step 2/5 : WORKDIR ~/qmx ---> Running in 3aafa7bef149 Removing intermediate container 3aafa7bef149 ---> c2892117f608 Step 3/5 : RUN echo "Hello Docker!" ---> Running in 33461defb47a Hello Docker! Removing intermediate container 33461defb47a ---> 3da8c691a4c8 Step 4/5 : COPY app.py main.py ---> 82b24de5eae7 Step 5/5 : CMD python main.py ---> Running in 8328eccf17a9 Removing intermediate container 8328eccf17a9 ---> 8a05929b777c Successfully built 8a05929b777c Successfully tagged qmx:1.0 root@iZ8vbc32qrjl6z690p658hZ:~/docker# ls 1 app.py Dockerfile
Flask环境构建 1 2 3 4 5 6 7 8 9 10 11 12 13 14 15 16 17 18 19 20 21 22 23 24 25 26 FROM python:3.6 -alpineLABEL author="iBoy<547142436@qq.com>" version="1.0" description="CTGU SWZL" WORKDIR /www/wwwroot/ctguswzl.cn COPY . . RUN chmod +x docker-entrypoint.sh RUN sed -i 's/dl-cdn.alpinelinux.org/mirrors.tuna.tsinghua.edu.cn/g' /etc/apk/repositories \ && apk --update add --no-cache --virtual build-dependencies g++ gcc libxslt-dev python-dev zlib-dev python3-dev openssl-dev \ && apk add jpeg-dev mysql-dev freetype-dev \ && pip config set global.index-url https://pypi.tuna.tsinghua.edu.cn/simple \ && pip install --upgrade pip \ && pip install --no-cache-dir -r requirements.txt \ && apk del build-dependencies \ && rm -rf /var/cache/apk/* \ && rm -rf /root/.cache \ && rm -rf /tmp/* ENV C_FORCE_ROOT TrueEXPOSE 8888 ENTRYPOINT [ "./docker-entrypoint.sh" ]
1 2 3 4 5 6 7 8 9 10 11 12 13 14 15 16 17 18 19 20 21 22 23 FROM python:3.8 -alpineENV TZ Asia/ShanghaiWORKDIR /app COPY pyproject.toml poetry.lock bot.py /app/ RUN set -ex; \ sed -i 's/dl-cdn.alpinelinux.org/mirrors.tuna.tsinghua.edu.cn/g' /etc/apk/repositories; \ apk --update add --no-cache --virtual build-dependencies build-base gcc g++ python3-dev musl-dev jpeg-dev libressl-dev libffi-dev libxslt-dev zlib-dev openssl-dev; \ pip config set global.index-url https://pypi.doubanio.com/simple; \ pip install --upgrade pip; \ pip install -U setuptools pip; \ python3 -m pip install poetry; \ poetry config virtualenvs.create false ; \ poetry install --no-root --no-dev; \ rm -rf /var/cache/apk/*; \ rm -rf /root/.cache; \ rm -rf /tmp/* /var/tmp/* ; ENTRYPOINT ["python" ,"bot.py" ]
Tomcat镜像构建 1 2 3 4 5 6 7 8 9 10 11 12 13 14 FROM centosRUN mkdir -p /docker_home/local ADD tomcat7 /docker_home/local /tomcat7 ADD java18 /docker_home/local /java18 ENV JAVA_HOME /docker_home/local/java18/ENV CATALINA_HOME /docker_home/local/tomcat7ENV PATH $PATH:$JAVA_HOME/bin:$CATALINA_HOME/binEXPOSE 8080 CMD ["/docker_home/local/tomcat7/bin/catalina.sh" ,"run" ]
Docker网络 容器和宿主机通信
容器之间如何通信
不同Docker网络之间怎么通信
Docker网络的原理
卷技术 (数据卷 volumes) 具名挂载
匿名挂载
/vae/lib/docker/volumes/
实现容器数据的持久化(Mysql,Redis)
实现配置文件的自定义
容器数据卷 实现容器间的数据共享
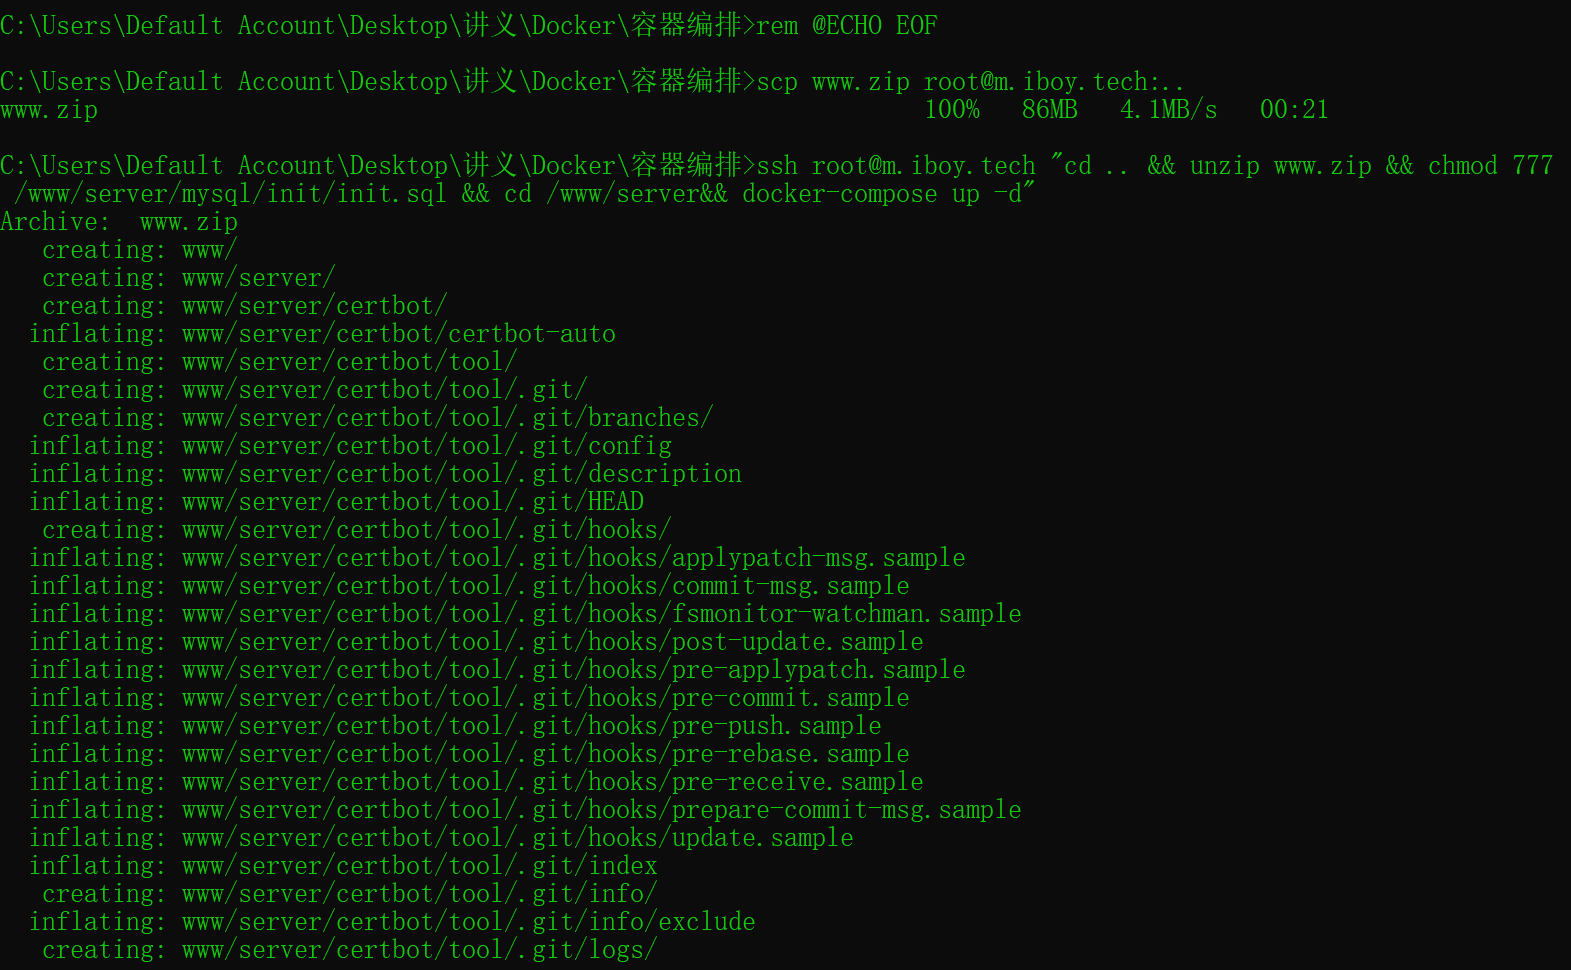
容器编排与自动化部署
创建项目 1 2 3 4 5 6 7 8 9 10 11 12 13 14 15 16 17 18 19 20 21 22 23 24 25 26 27 28 29 30 31 32 33 34 35 36 37 38 39 40 41 42 43 44 45 46 47 48 49 50 51 52 53 54 55 56 57 58 59 60 61 62 63 64 65 66 67 68 69 70 71 72 73 74 75 76 77 78 79 80 81 82 83 84 85 86 87 88 89 90 91 92 93 94 95 96 97 98 99 100 101 102 version: '2' services: springboot1: image: openjdk:8-jdk-alpine container_name: web1 volumes: - /www/wwwroot/m.iboy.tech/demo-0.0.1-SNAPSHOT.jar:/www/wwwroot/m.iboy.tech/app.jar - /etc/timezone:/etc/timezone - /etc/localtime:/etc/localtime command: /bin/sh -c "cd /www/wwwroot/m.iboy.tech && nohup java -jar app.jar" privileged: true networks: - 'net' depends_on: - redis - mysql restart: always springboot2: image: openjdk:8-jdk-alpine container_name: web2 volumes: - /www/wwwroot/m.iboy.tech/demo-0.0.1-SNAPSHOT1.jar:/www/wwwroot/m.iboy.tech/app.jar - /etc/timezone:/etc/timezone - /etc/localtime:/etc/localtime command: /bin/sh -c "cd /www/wwwroot/m.iboy.tech && nohup java -jar app.jar" privileged: true networks: - 'net' depends_on: - redis - mysql restart: always mysql: image: mysql:5.7 container_name: mysql ports: - 3306 :3306 volumes: - ./mysql/data:/var/lib/mysql - ./mysql/conf:/etc/mysql/conf.d - ./mysql/logs:/var/log/mysql - ./mysql/init:/docker-entrypoint-initdb.d privileged: 'true' env_file: - ./mysql/mysql.env command: --character-set-server=utf8mb4 --collation-server=utf8mb4_unicode_ci networks: - 'net' restart: always redis: image: redis:alpine container_name: redis ports: - 6379 :6379 volumes: - ./redis/data:/data - ./redis/conf/redis.conf:/usr/local/etc/redis/redis.conf - /etc/timezone:/etc/timezone - /etc/localtime:/etc/localtime command: redis-server /usr/local/etc/redis/redis.conf networks: - 'net' restart: always nginx: image: nginx:alpine container_name: nginx ports: - '80:80' - '7000:7000' - '443:443' volumes: - ./nginx/proxy:/etc/nginx/proxy - ./nginx/cert:/etc/nginx/cert - ./nginx/conf.d:/etc/nginx/conf.d - ./www/wwwroot:/etc/nginx/sites-available - ./nginx/conf/nginx.conf:/etc/nginx/nginx.conf - ./nginx/logs:/var/log/nginx - /etc/timezone:/etc/timezone - /etc/localtime:/etc/localtime - /www/server/nginx/cache:/etc/nginx/cache - /www/wwwroot:/www/wwwroot depends_on: - springboot1 - springboot2 networks: - 'net' restart: always networks: net: driver: bridge
加入已有的项目 1 2 3 4 5 6 7 8 9 10 11 12 13 14 15 16 17 18 19 20 21 22 23 version: '2' services: springboot: image: openjdk:8-jdk-alpine container_name: springboot_app ports: - 8080 :8080 working_dir: /www/wwwroot/java volumes: - /www/wwwroot/java:/www/wwwroot/java - /etc/timezone:/etc/timezone - /etc/localtime:/etc/localtime command: /bin/sh -c "nohup java -jar app.jar" privileged: true networks: - 'server_net' cap_add: - ALL restart: always networks: server_net: external: true
相关资源
👉 Docker练习平台:http://play-with-docker.com
👉 Docker官方文档: https://docs.docker.com
👉 Docker官网:https://www.docker.com
👉 Docker Hub:https://hub.docker.com
👉 菜鸟教程Docker: https://www.runoob.com/docker/docker-tutorial.html
深入学习 docker machine
docker swam
k8s
jenkins
docker run